Master Hard Boiled Eggs: Tips for Easy Peeling and Creamy Yolks
Achieving the perfect hard-boiled egg might seem like a simple task, but anyone who has wrestled with a stubborn shell or cringed at a greenish-gray yolk knows it's an art. The quest for that ideal texture – firm, tender whites embracing a beautifully creamy, vibrant yellow yolk – often feels elusive. But what if we told you there's a foolproof method to guarantee success every single time? Forget the days of frustration; we’re here to guide you on
how to make perfect hard boiled eggs, complete with effortless peeling and that desirable custardy center.
Hard-boiled eggs are culinary chameleons, versatile enough for a quick protein-packed snack, the star of a deviled egg platter, a crucial component in egg salad, or an elegant addition to salads and sandwiches. Mastering this fundamental technique will unlock a world of delicious possibilities in your kitchen.
The Elusive Perfect Hard-Boiled Egg: Why It Matters
Why the fuss about something as seemingly basic as a hard-boiled egg? Because the difference between a mediocre and a magnificent one is vast. A perfectly cooked hard-boiled egg boasts:
*
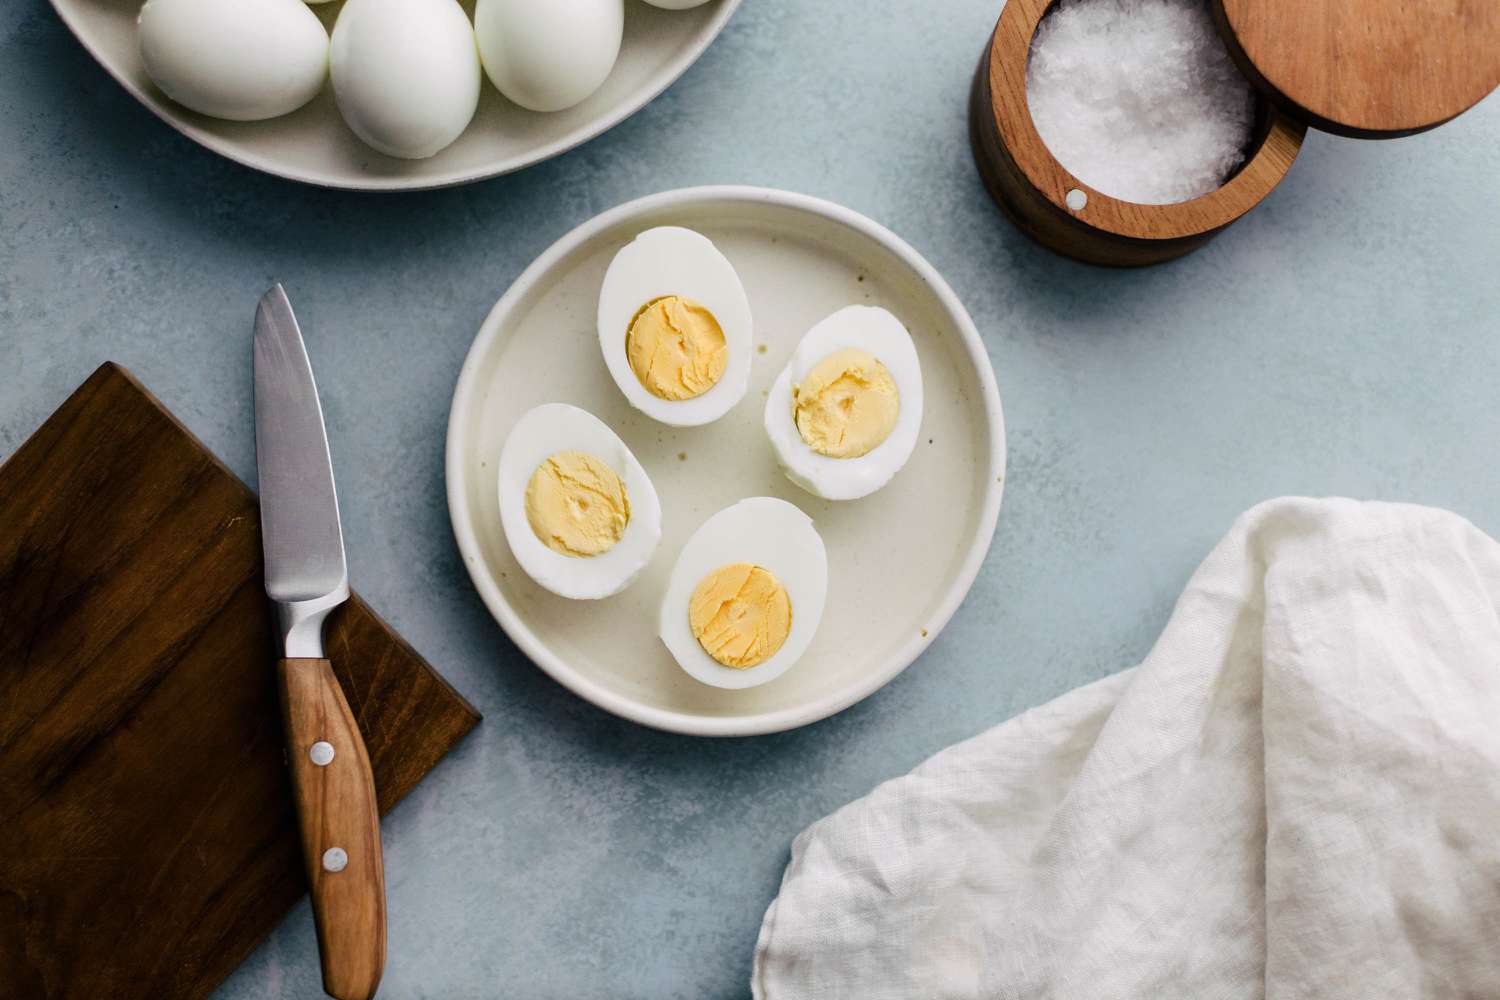
Firm, Tender Whites: Not rubbery or overly tough, but a pleasant, yielding texture.
*
Creamy, Bright Yellow Yolks: Fully set but still moist and rich, never dry or chalky. Crucially, free from the dreaded greenish-gray ring.
*
Effortless Peeling: The shell slips off easily, leaving a smooth, intact egg white.
The notorious green ring around the yolk is a tell-tale sign of overcooking. It's formed when sulfur in the egg white reacts with iron in the yolk, creating iron sulfide. While harmless to eat, it's visually unappetizing and indicates a drier, less flavorful yolk. Similarly, struggling with a shell that takes half the egg white with it can be incredibly frustrating, especially when preparing a large batch. We're here to banish these common hard-boiled egg woes for good.
The Foolproof Method: How to Make Perfect Hard Boiled Eggs Every Time
After countless experiments and kitchen tests, we've refined a method that guarantees consistent perfection. This technique focuses on gentle, controlled cooking and a crucial cooling step to ensure beautiful yolks and easy-to-peel shells.
What You'll Need:
* Eggs (preferably 5-10 days old, not farm-fresh)
* A saucepan large enough to hold eggs in a single layer
* Cold water
* Slotted spoon
* Large bowl
* Ice
Step-by-Step Instructions:
1.
Careful Selection and Placement: Gently place your desired number of eggs in a single layer at the bottom of your saucepan. Avoid overcrowding, as this can lead to uneven cooking and cracks. It's important to use eggs that are a few days old rather than extremely fresh ones, as older eggs tend to peel significantly easier. Before placing them, quickly check for any visible cracks or dings; a compromised shell might leak during cooking.
2.
Cold Water Start: Pour cold water over the eggs until they are covered by at least 1 to 2 inches. Starting with cold water allows the eggs to heat up gradually, preventing the whites from becoming rubbery and reducing the risk of cracking.
3.
Bring to a Rolling Boil: Place the pot on high heat and bring the water to a rapid, rolling boil. You'll see plenty of vigorous bubbles and the eggs "dancing" slightly.
4.
Off-Heat Cooking: As soon as the water reaches a full, rolling boil, immediately remove the pot from the heat source. Do not continue to boil the eggs. Cover the pot tightly with a lid.
5.
The Critical Sit Time: Let the eggs sit undisturbed in the hot water for 10-12 minutes.
* For a slightly creamier, more custard-like yolk, aim for
10 minutes.
* For a firmer, fully set but still moist yolk that's perfect for deviled eggs or egg salad, go for
12 minutes.
*
(If you prefer an even firmer yolk, reminiscent of some classic recipes, you could extend this to 17 minutes as some methods suggest, ensuring the ice bath is prompt and effective.)
6.
The Essential Ice Bath: As soon as the cooking time is up, use a slotted spoon to carefully transfer the eggs from the hot water into a large bowl filled with ice water. This "ice bath" step is absolutely crucial. It immediately stops the cooking process, preventing overcooked, greenish yolks, and helps the egg whites contract, separating them from the shell membrane for easier peeling. Let them cool in the ice bath for at least 5-10 minutes, or until thoroughly chilled.
7.
Peel and Enjoy: Once cooled, your eggs are ready to peel! For best results, peel them under cool running water. Tap the wider end of the egg lightly on a counter to crack the shell, then gently roll it between your palms to create more cracks. Starting from the larger end where the air pocket usually is, carefully peel away the shell. The running water helps loosen any stubborn bits and washes away tiny shell fragments.
This method is remarkably consistent and will quickly become your go-to. For more specific insights on achieving this consistency, check out
The Foolproof Method for Perfect Hard Boiled Eggs Every Time.
Insider Tips for Effortless Peeling and Creamy Yolks
While the method above is robust, understanding the *why* behind each step, and incorporating a few extra tricks, can elevate your hard-boiled egg game even further.
*
Egg Age is Your Ally: This is perhaps the most impactful tip for easy peeling. Older eggs (5-10 days old) have a larger air cell and a slightly higher pH level than farm-fresh eggs. This combination causes the albumen (egg white) to adhere less strongly to the inner membrane of the shell, making peeling a breeze. Fresh eggs, while wonderful for frying or poaching, are notorious for sticking to their shells when hard-boiled.
*
The Cold Water Advantage: Starting eggs in cold water isn't just about preventing cracks; it also ensures more even cooking. As the water heats up, the egg whites cook gradually and consistently, leading to a tender texture throughout.
*
The Ice Bath is Non-Negotiable: We cannot stress this enough. The rapid temperature change from hot water to ice water not only halts cooking to prevent the dreaded green ring but also causes the egg white to contract quickly. This contraction helps to pull the egg white away from the inner membrane of the shell, making it significantly easier to peel without losing chunks of the delicious white. Think of it as shocking the egg into letting go of its shell.
*
Gentle Peeling Techniques: Beyond tapping and rolling, try peeling under running water or submerging the egg in a bowl of water. The water helps get under the shell, creating a cushion that lifts it away. Starting at the large end, where the air pocket is located, often provides the easiest starting point.
*
Don't Overcrowd the Pot: Give your eggs space. Overcrowding can lead to uneven cooking, and the eggs banging against each other can cause cracks. Cook in batches if necessary.
*
Storage Savvy: Hard-boiled eggs can be stored in their shells in the refrigerator for up to one week. Once peeled, they should be eaten within a day or two for best quality, or stored in an airtight container submerged in water to prevent drying out.
For a deeper dive into these techniques and to specifically address how to avoid that green ring and ensure easy peeling, check out
Perfect Hard Boiled Eggs: No Green Ring, Easy Peel Every Time.
Troubleshooting Common Hard-Boiled Egg Hurdles
Even with the best intentions, sometimes things go awry. Here’s how to troubleshoot common hard-boiled egg problems:
*
The Dreaded Green Ring: This is almost always a sign of overcooking. The sulfur and iron reaction happens when eggs are subjected to heat for too long. To avoid it, adhere strictly to the recommended sit times (10-12 minutes) and always use an immediate ice bath.
*
Stubbornly Sticky Shells: If you're consistently battling sticky shells, revisit these key points:
* Are you using older eggs? This is the number one fix.
* Are you using an ice bath? The rapid cooling is critical for shell separation.
* Are you cooling them sufficiently? Ensure they are fully chilled before peeling.
*
Cracked Eggs During Boiling: Cracks can happen for several reasons. To minimize them:
* Start with cold water, allowing for gradual temperature increase.
* Don't overcrowd the pot.
* Handle eggs gently when placing them in the pot.
* Avoid dropping cold eggs directly into boiling water (though our method avoids this by starting cold).
*
Yolk Consistency Woes (Too Soft/Too Hard): The beauty of the off-heat method is the control it gives you. If your yolks are too soft, increase the "sit time" by 1-2 minutes next time. If they're too hard or chalky, reduce the sit time by a minute or two. Remember, 10 minutes gives a creamier yolk, while 12 minutes results in a firmer, yet still moist, consistency.
Conclusion
Mastering
how to make perfect hard boiled eggs is a culinary skill that pays dividends. No longer will you dread the peeling process or settle for unappetizing yolks. By following our foolproof method – focusing on the cold water start, precise off-heat cooking times, and the indispensable ice bath – you'll consistently achieve eggs with tender whites, gloriously creamy yolks, and shells that practically leap off. So go ahead, grab a dozen eggs, and put these tips into practice. Your salads, deviled eggs, and snack times will thank you!